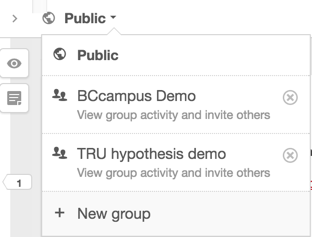
Groups are the answer to the questions: Do I have to share my annotations with the whole world? or, Can I just do annotation with one class/section/year of students? Groups can be used instead of “Public” or “only me” when both displaying annotations and creating annotations, if you are the creator or a member of a group.
Creating a Group
On the dropdown that usually says “Public” in the top bar of the hypothes.is panel is an item called “New group”.
When you select “New group” the create a group window will open in a new tab or browser window. All that is required is a group name, but you may find it handy to enter a description as well. Once that’s done your group will appear on the same menu shown above, under Public. You can see that there are already two groups that I am a member of on the menu shown in the diagram above.
Now you need to add people to the group. Actually people add themselves with a special link that you give them. The link is displayed on the group page which you arrive at while creating a group. You can get back to this page later in the following way:
- Either go to the account drop-down in the panel. (To the far right of the Public drop-down). That will open a new tab/window to your account settings on the hypothes.is website.
Alternately, goto/login to the hypothes.is website and click on your username in the top right next to the logout link. - Either way now you should see a “groups” menu next to your name in the top right.
- Open the groups menu and select the group you want to work with.
- On the right side, below the members list will be the link for inviting new group members. There is a handy “copy” icon to copy the url to your pasteboard for pasting into an email or message.
Joining a Group
In order to join a group, users need to have the link. Here is an example of a link from a demo group I created for our in-house workshop.
https://hypothes.is/groups/BRpnJbPy/tru-hypo-demo
Users can join the group by clicking the link and following the instructions. They will either need to login or be logged in to join the group. They can also create an account if they don’t have one.
Users can also go to the group window and see statistics and group members.
Final group notes
With a group in place, users can do the following:
- limit the viewers of annotations to a specific group as the annotation is created;
- limit the annotation display in the panel to the annotations of a specific group.
This enables you to annotate with research partners, or set activities for a particular class or course section.
Sources:
https://hypothes.is/creating-groups/
https://hypothes.is/annotating-with-groups/
